I love cakes, cookies, pies, tarts, sweets and basically all lovely treats born out of an oven that I have decided to bake. This way, I can always have more than one serving...

Wednesday, September 30, 2009

Pineapple Tarts

I won't really call it a tart, it's more like a cookie but pineapple tart is the rightful name for this festive baked good. The one thing I love most about Chinese New Year has gotta be pineapple tarts. I am THE pineapple tart monster. I can forego everything else but not these golden lovelies.

There are 2 different kind of pineapple tarts - one is where the filling is exposed and sitting on top of the pastry and the other kind is what I did here, where the filling is rolled up in a ball of pastry. I call this the modern pineapple tart.

There are also 2 different kind of pastry - one is crunchy and the other is a soft texture that melts in your mouth and lines the inside of your mouth even when you have swallowed the pineapple tart. The latter is how I made them. Best part of baking your own has gotta be having full control of making them the exact way you like them!


Be prepared to spend 2-3 hours in the kitchen making these lovelies! Here's what you'll need:
Pastry dough:
- 2 1/2 cups flour
- 2 tablespoons cornstarch
- 1/4 teaspoon salt
- 4 tablespoons confectioners' sugar
- 1 cup unsalted butter (at room temperature)
- 2 egg yolks
Pineapple filling:
- 2 cans of sliced pineapples
- 10 tablespoons brown sugar
- 1 teaspoon cornstarch
- 1 teaspoon water
- 1 egg yolk (for brushing)
Gotta have patience with this as it will take awhile but hey, baking is all about patience!
1. Pineapple filling: Crush the sliced pineapples and chop them up into tiny tiny little pieces as if they are mashed up. (Best if you have a food processor, dump the pineapples in and pulse them for about 10 seconds.)
2. Drain water out of the pineapples. (This is important, you must drain out as much water as possible, or it will take you longer to cook it.)

3. Cook the drained pineapples and brown sugar in a saucepan. Cook it until most of the liquid evaporates. Then add in the cornstarch mixed with the water to thicken the filling. This will take about 10 mins. Then set aside to cool in the fridge.


4. Pastry dough: Sift the flour, cornstarch, salt and confectioners' sugar.


5. In another bowl, cream the butter until light and smooth.


6. Add in the egg yolks then slowly beat in the flour mixture. (Do not pour all the flour in at a go, do this in 4 parts.) The mixture will resemble a rough dough as seen below, this is normal if you are using a hand mixer.


7. After all the flour is incorporated, use your hands to knead the dough on a floured surface and it will come together.


8. Divide the dough and pineapple filling into 24 rounds.


You may place 12 rounds of the dough in the fridge first while you assemble the first 12. This allows the dough to remain firm and dry.
9. Preheat the oven to 350 degrees F, 177 degrees C. Line a baking tray with parchment paper.

10. Flatten the dough in your palms and place the filling in the middle.


11. Then roll the dough into a log shape.


12. Use a small knife to make criss-cross patterns on the dough.


13. Brush the top of the tarts with egg yolk. (If you like your tarts to be golden all over, you can brush more of the tart with egg yolk.)


14. Bake in the oven for 25 mins or until the tarts turn a light brown/gold.


I made 24 of these and I have 4 left in less than 24 hours. Told you I'm the pineapple tart monster.

Monday, September 28, 2009

Who doesn't love Pancakes?

With a special request for pancakes, I woke up an hour earlier on Sunday morning to get cracking in the kitchen. It was a pleasure anyway, playing with flour and enjoying the quietness in the morning.

This recipe leaves you with a light and fluffy pancake that can be eaten in many ways - roll them up with savory or sweet filling; eat them plain as they are; simply dust confectioners' sugar over them or have them they way I did, with butter and maple syrup!


Here're the simple ingredients and recipe:
- 1 cup flour (do not sift)
- 2 teaspoons baking powder
- 1/4 teaspoon salt
- 2 tablespoons white sugar
- 1 large egg
- 1 cup milk
- 2 tablespoons unsalted butter (softened)
1. Whisk together flour, baking powder, salt and sugar. Set aside.

2. In another bowl, whisk together egg, milk and butter.


3. Add the egg mixture to the flour mixture and mix until it is combined. The batter should have small lumps. Do not over mix or your pancakes will be tough.


4. Heat a small or med size frying pan to medium heat. Brush the pan with butter.
5. Pour 1/4 cup of the batter onto the pan.


6. Once several bubbles appear, it is time to make that flip!


7. Then let it cook for another 1-2 mins on the other side. And it's done!


I am not sure if this will work for you - but I turn the heat to low after my first pancake as I realise that my second pancake always burn a lil too fast and after I turn the heat down, the rest of the pancakes turn out beautifully! Don't despair if a few don't turn out the way you want them to, keep pouring in the batter and do as many pancakes as you can. After a few tries, you will get the hang of it.

Thursday, September 24, 2009

Yellow Cupcakes

At a birthday party a couple of months back, I noticed that - if you give a kid the choice between a cookie and a cupcake, they will choose the cupcake. And I truly enjoyed watching the little boy nurse his cupcake the whole night. Even when he couldn't stuff his face anymore, he refused to give up his cupcake.

Sometimes I bake because I have a craving. But most of the time, I bake simply for the joy of baking, and seeing the faces of those who sink their teeth into my baked goods. As I remember that little boy's face when he licked and munched on his cupcake, I decided to bake yellow cupcakes topped with colored sprinkles - every little kid's fascination.


This recipe is really easy and even if you have never baked before, you won't find this difficult atall. You combine all dry ingredient together, and combine all wet ingredient into the same bowl as the dry ones. And that's what makes the yellow cupcake! And the most yummy part of the cupcake has gotta be the chocolate fudge frosting. Now that should be enough motivation to start baking!
Here's what you'll need:

Cupcake batter:
- 1 1/2 cups flour (do not sift)
- 1 cup granulated white sugar
- 1 1/2 teaspoons baking powder
- 1/4 teaspoon salt
- 1/2 cup unsalted butter
- 1 large egg
- 2 egg yolks
- 1 1/2 teaspoons vanilla extract
- 1/2 cup sour cream
Chocolate fudge frosting:
- 4 oz unsweetened baking chocolate
- 2/3 cup unsalted butter
- 1 1/3 cups confectioners' sugar
- 1 1/2 vanilla extract
Garnish (optional):
- colored sprinkles

1. Preheat oven to 350 degrees F, 177 degrees C. Line the muffin tin with muffin papers.

2. Cupcake batter: Whisk together flour, white sugar, baking powder and salt.


3. Add in the butter, large egg, egg yolks, vanilla extract and sour cream (dump everything into the flour mixture bowl). Beat until the batter is smooth.


4. Evenly fill all muffin cups with the batter (only fill 3/4 of the cups).


5. Bake for 20 - 25 mins, until an inserted toothpick comes out clean. Place on a wire rack to cool.


6. Chocolate fudge frosting: Melt the chopped unsweetened chocolate in a heatproof bowl over a saucepan of simmering water. Melt it until it is smooth and satiny. Then let it cool to room temperature.


7. In a separate bowl, beat the butter until smooth.


8. Then add the confectioners' sugar and beat until light and fluffy. And beat in the vanilla extract.


9. Add the chocolate and beat until smooth and glossy.


10. Once the cupcakes have cooled completely, spread the frosting on the cupcakes and topped with colored sprinkles.


These cupcakes are definitely best eaten on the day they are baked. If not, they can be stored at room temperature for 3-4 days. Super duper yummy!!!!

Tuesday, September 22, 2009

Bread Pudding Muffins

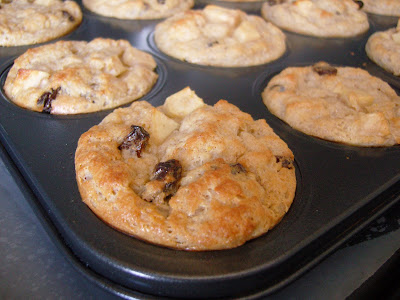
This week there will be 2 batches of baked goods! With leftover bread, I started the week off with Bread Pudding Muffins. Of course the type of bread you use is crucial - I used Italian bread in this recipe but I would recommend French bread where it's more sturdy with a thinner crust. The muffins also hold apple chunks and raisins making it a soft and sweet start to the week!

Apparently, centuries ago, it's very common for households to have a large bowl sitting in the kitchen to "collect" all stale bread. Once the bowl was full, it's time for a rich and creamy bread pudding. Interesting!


Here's what you'll need for these muffins:
- 7 cups of bread cubes (French, Italian, Broiche or Croissant and crusts can be left or removed)
- 1 cup light cream
- 1 cup milk
- 4 eggs (beaten)
- 2/3 cup white sugar
- 2 teaspoon vanilla extract
- 6 tablespoon butter (melted and cooled)
- 1/3 cup flour (do not sift)
- 1/2 tablespoon baking powder
- 1/2 teaspoon salt
- 1/2 teaspoon ground cinnamon
- 1 tablespoon grated lemon zest (outer skin of lemons which contains the fruit's flavour and fragrance)
- 1/2 cup raisins
- 1 apple (cut in chunks)
And we're ready to bake bake bake!
1. Preheat the oven to 350 degrees F, 177 degrees C. Butter the muffin tin.

2. Cut the bread into cubes and the apples into small chunks.


3. Place the bread cubes in a large bowl, add light cream and milk. Let it stand for 5 mins.


4. In another bowl, stir together the beaten eggs, white sugar, vanilla extract and butter. Then pour in over the bread cubes.


5. In another bowl, combine the flour, baking powder, salt, ground cinnamon and grated lemon zest.


6. Stir the flour mixture into the bread cube mixture.


7. Fold in the raisins and apple chunks.


8. Divide the batter into the muffin tins filling it up to the brim.


9. Bake in the oven for 25 - 30 mins until the a toothpick comes out clean.


Leave them in the tin for 10 mins and remove the muffins, let it cool on a wire rack. You can have this with confectioners' sugar topped over or with a scoop of vanilla ice cream! You can also store them at room temperature for 2-3 days.
This recipe is easy and it takes less than an hour to prep! Try them!

Followers